Showing posts with label DIY. Show all posts

Friday, September 7, 2012

Final Dining Room/Living Room Reveal


 The best part of any project is the finished product.  There is nothing I love more than sitting in my home and looking at my hard work.  This was one of the largest projects I have taken on but in return has had the largest impact.  I love this room.  I think if I could put my decorating style into one picture it would be this room.  It's rustic and warm, cost effective and glamorous, vintage yet trendy. 

 
We took a beige box of a room with dark inexpensive furniture and painted it "Sage Silver" from Restoration Hardware.  We highlighted the large windows and door on the one wall by painting it white and hanging sheer white drapes.

Our dining room and living room are connected so it was important to me to find comfortable chairs for the head of the table so they could be dragged over for extra occasional seating.  I also wanted something to anchor the two ends of the table.  These chairs are the perfect colour and the perfect size.


Magazine picture...seriously is this my house?  I LOVE it!


This chair is another focal point of the room.  Mr. D spotted it and I thought it was perfect.


 This sweet toy bin is from Target...our poor OCD child freaked when I brought this home and started shifting all her toys from the old red bin to this...I eventually gave up and waited until she went to bed to complete the switch over.  It didn't seem to bother her when their was no other option.


Thursday, September 6, 2012

Dinning Room Makeover {Table}

The next step in our dinning room makeover was the table. We spent time looking at every table known to man kind.  I started with a budget of about $500 but over time bumped that to $1,000.  When I was ready to spend $1,000 on a table I didn't love I knew something had to give.  I just couldn't justify spending that much on a table.  Feeling frustrated I told my family over dinner about our frustration in trying to find a table.  My brother and law said "We have a table you can have."  Excited about another DIY and the possibility of coming in way under budget I double checked that he knew I wasn't going to just put it in our dining room...I wanted to white wash it.  As we talked about it I found out that this table has had many homes and been past from one sibling to the next....so on that note, thank you to all my extended siblings for adding to the character of this table.

Here is the table...


It started as a fairly ordinary, well made, sturdy table.  I love the shape of the table but felt as though the yellowy orange stain didn't match the rustic chic look I was going for.  So I decided to strip the table, sand it down and white wash the top.


One of my favourite parts of this project was spending time with my husband.  Normally when I launch into project mode, he rolls his eyes and heads for the couch...he watches football while I work on projects via trial and error.  This time he was excited about the project (maybe just the money he was saving???).  This is him stripping the table and next is him using a power sander...not going to lie, he looked hot with a power tool.


Once all the sanding was done I mixed one part paint with two parts water to white wash the top and since it has been awhile since I actually finished this table I can't remember what the final measurements were that I used.  I added more white paint as I felt it was too subtle.  Essentially I painted the mixture on then wiped it off.  Just that easy!  We wanted to seal the top without getting a shinny top so we sealed it with a matte clear varathane.


Our first dinner for two at our new table!


Wednesday, September 5, 2012

Dining Room Makeover {Chairs}

We did a Dinning room makeover a few months ago, but as life got busy I never got to share it.  Since it is one of my most successful makeovers (if I do say so myself) I had to share it.  Better late than never right?

I have wanted to get a new dinning room table for some time now.  Our old table was a Bistro set and the tall table and chairs were just not working with a Toddler.  My style has also changed a lot and I felt as though the Target set I died to have when we first got married (way back four years ago) was way to matchy matchy!

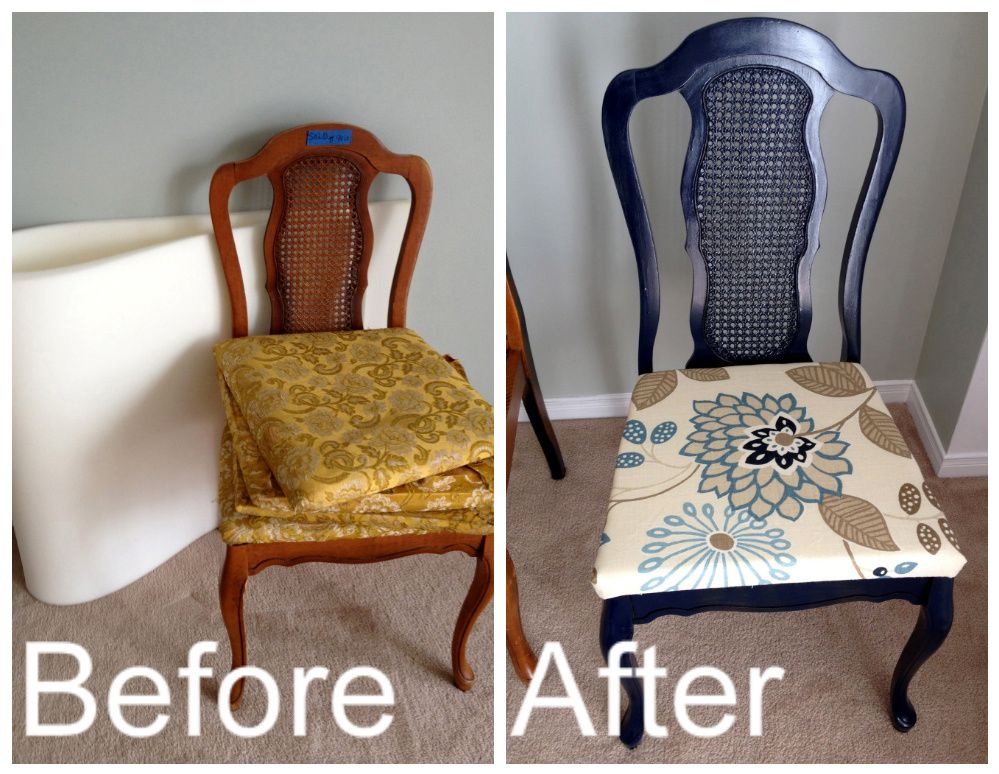
I recently purchased these chairs, 4 for $35 dollars from my favourite thrift store.


They needed lots of work, sprayed, recovered ect. but I loved the shape, their style and their price.  Enter blog world!  Here are some chairs that have inspired my transformation and confirmed in my mind that purchasing second hand gives character and style to your home, not to mention is completely cost effective.


Chairs from blog He and I, seen here.


By Sarah, from Three Boys, See Before and After here.


Chairs from All Things Thrifty, See Before and After here.  Isn't this fabulous?  Everything Brooke does is this beautiful.


Sarah Richardson, Design Show 2011

Bold, pops of colour scare me a little but when done correctly they are awesome.  It makes a statement and keeps your space unique.  When my Mom suggested I paint my chairs navy I was really nervous.  I wanted them to be a statement but I was leaning more to white chairs with a loud fabric.  Well, Wendy came through again!  She was right..the navy is awesome!


When it was all said and done the 4 chairs cost about $100 to purchase and re-finish.  This was just the beginning of our Dinning room Makeover!


Wednesday, August 29, 2012

Second Birthday Party Project #5 ~ Gift


Here is the fifth and final project for The Boss' Second Birthday Party! (Thought I better post it before she turns three...jk).

One of my biggest pet peeves are houses that look like Toys R Us threw up in their living room.  There are a few reasons for this but the biggest is that the space no longer belongs to the family but the children and linked to this are all knids of other issues such as greed, entitlement ect.  Since The Boss is spoiled by family and friends Mr. D and I try to focus on one main gift rather than buying her everything in sight.  Don't get me wrong, we spoil her all the time (she loves Starbucks as much as her Mommy) but we are trying to teach her to enjoy what she has.

Last year it was her kitchen seen here, she LOVED it.  This year I really wanted to add a table for her to server her "guests".  While it took a little convincing Mr. D eventually saw the benefit in it and since then we have enjoyed many "romantic dinners" of coffee and soup served by an all too eager two year old waitress!


I purchased this table on Kijiji for $25.  We sanded and painted it to co-ordinate with The Boss' room.


We sanded and primed it first since it had a varnish on it.


I took The Boss to her room to get dressed and Mr. D brought out her table...she instantly knew what to do.  I think it was love at first sight.    She wasted no time at all.


We then took the table to her bedroom where she hosted her first tea party...and Mr. D again found himself wrapped right around her finger.  He swore he would NEVER sit at a little table drinking tea...


Looks pretty comfortable here to me.  Dad of the year, and the happiest two year old in town!


Linking up here:

Sugar and Dots
Domestically Speaking

Monday, August 27, 2012

Wedding DIY

The word DIY has nearly put wedding planners and wedding decorators out of business.  Why pay for something you can do yourself? I love all the creative ideas that are taking your average wedding to a creative and romantic expression of the bride and groom.  This weekend my cousin married his sweet bride and while I appreciated every single DIY they included there was one person who took this concept to a new level...my Mom!

Like every good Auntie she started shopping for and planning her outfit for their big day the moment she found out they were engaged.  She started with a cute dress but when it came to shoes and accessories she started wishing she just wore something she already had.  (Fashion Faux pas... don't be the Auntie recycling dresses at your nephew's wedding...just kidding!  New accessories can bring new life to any outfit).   Anyway, she finally secured shoes, nail polish and jewelry but she could not find a purse that would work...enter wedding DIY!

My Mom fashioned a new purse from one of her grandmother's old purses and a pillow case she no longer uses on a toss cushion.  She explained her plan to me as I drove home from work one day and my response was "I'll be there in 5".  Not sure which was the greatest draw, my extreme respect and excitement for her creative genius OR my extreme uncertainty of whether she would be able to pull it off.

She started with her old purse and her pillow case.   We planned her attach and she drew cutting lines about an inch from the purse to allow sewing room.


She cut along the lines then sent it home with her favourite daughter (me...) to sew the rounded edge, connecting the front and the back of the purse.


She then hand stitched gathers into the purse tucking her stitches under the gold clasp of the purse.  (Not my project so I don't have pictures of this)

Next thing I knew she is ready to go.  Look at this beauty?  To say I was impressed is an understatement.


 What a wonderful weekend as a family celebrating the extension and the growth of our family.  Speaking of DIY's one of our favourite parts of the wedding we were at was the photo area.  Even Granny (she's 87) got in on the fun!


Another fun "DIY" if you will,  was when my cousin and I showed up rocking matching sock buns.  Not a word of a lie, our hubby's had no idea until we told them, that we had socks in our hair.  For some reason they thought it was gross...we were hot until we told them!


Congrats Robyn and Joel!  Thanks for giving us a reason to get dressed up and spend time as a family!  We had lots of fun being part of your day!

Linking up here:

Sugar and Dots

Tuesday, June 5, 2012

Second Birthday Party Project #2 - Party Hats

If you remember my party hats from last year, you remember that I added a little flair to them.  All the little girls had Baby Girl bows on them.  This year I again swayed from the traditional party hat.  Don't get me wrong, EVERY party needs a party hat, but it's time to be a little more creative!  I have always loved Minnie ears, we even tried to buy them for The Girl for Christmas but they were sold out, so...I made her one!


I started by collecting my materials.  I already had most of the materials so all I purchased was the headbands from the dollar store.  Each set of ears therefore cost me $1 to make.


I started by cutting the ear shapes out of some foam I had and then covering them with black satin I had.  I sewed the satin leaving one end open to insert the foam.  I removed the sequence flowers then glued the ears to the headband.


Next, I cut two squares from the poke-a-dot material and sewed the wrong sides together.  I left a small whole open and then flipped the material right side out.  I trimmed the edges, ironed and then top stitched it all the way around.  Once the squares were completed, I loosely stitched through the center and cinched it tight to make the bow.


I glued the bow on between the ears.  They aren't perfect but The Boss didn't care.  She LOVED them!


The Boss and her cousin are hams.  At Two years old they know how to strike a pose!


My poor nephew, he is always stuck with the two girls.  For him, I made a Mickey hat.  I cut two ears out of black scrapbook paper and glued them to a red party hat for him.  He seemed please and was more than happy to pose with TWO Minnies!